Posts

DIY Pallet Signs

Image
  This one is pretty easy.  We just took a pallet and cut all the boards up into little sections.  Then sand them down.  We used 60 grit followed by 220 grit.   Then, once sanded down.  Either paint or stain them to your liking. Now, if you have stencils you can use those or you can use Microsoft Word (or similar program.) We used word.  We typed in what we wanted on the board.  Made it the size and then the style of font we wanted.  Before you print it off, check your printer settings and see if you can print a mirror image.  Once its printed (should be a mirror image of what's on the computer).  Lay it across the board where you want the words to be.  Take a  paint brush just damp with water and go over where the ink is.  Then use the end of the paint brush and press firmly (not to hard though) to transfer the ink from the paper to the board.  We were then able to paint over the the letters....

Necklace holder

Image
Our latest craft that we have done is a Necklace Holder. First step:  Cut just half of a board off the pallet Then sand it down Then stain it, or paint it anyway you like. Then drill the holes for the knobs.  We got our knobs from Hobby Lobby for about $2 a piece.  Screw the knobs in.  Mark the knobs where it will be flush with the wood, then remove the knobs and cut the ends off so they don't stick out past the wood.  Screw the knobs back in.  Nailed in the picture hanger on the back. Now we are good to go.

Pallet book shelf

Image
One of the easiest things we built this year was a book shelf out of a pallet. Materials that you will need   1 pallet    Stain    Screws Basically you will just cut the ends off of the pallet leaving 2 boards on one side and 1 board on the other. Then very carefully remove  2 of the remaining boards from the pallet.  These will be used for the bottom of the shelf.  Screw the boards down.  Then just sand them down and either paint them or stain them. You can use them any way you like.  We used ours for books but have come across people using them to hold wine bottles.  And here is the final result:

Future Projects

Image
I t's been a long time since I posted of any of our projects that we have done but hopefully that will change this summer.  We are planning on doing a bunch of small projects.  A lot of the projects we plan on doing are going to be pallet based. If you have any tips, suggestions, comments, etc please leave comments.  I'm adding a few pics below on some of the ideas that I have found and plan on doing. 

Easy Work Bench

Image
   This is one easy work bench to build.  I was able to complete this within a couple of hours.   All you need to get is 1 sheet (4'x8') of 7/16 " OSB plywood and 5 2x4x8's.  When I bought the plywood from Lowe's I went ahead and had them cut the plywood in half(2'x8'), mainly because I don't have a table saw at home.  Anyways.  The original plans that I found are at hammerzone.com  Material List:   5 - 2x4x8   1 - 4x8 sheet of 7/16" OSB plywood   1 - 1lb of 3" galvanized deck screws   1 - 1lb of 1 5/8" galvanized deck screw    The first step is to cut the 2x4's.  The original plans that I found had the legs at 32".  To me that was too short.  I ended up making the legs at 44".   Once you cut the 4 legs, you need to cut the stretchers.  There are 4 long stretchers that are 48" long, and the 4 end stretchers are cut to 24" long.    The second step is to assemble t...

Nail polish rack

Image
We have a small counter in our dinning room/kitchen that my wife uses to store art supplies and nail polish etc.  She kept asking me to build a nail polish rack and shelves.  Well this is what I eventually came up with.  I had some scrap plywood and bought some 1x2 boards.  Then just pieced them all together.   And after everything was put back on the counter this is what it looks like now.

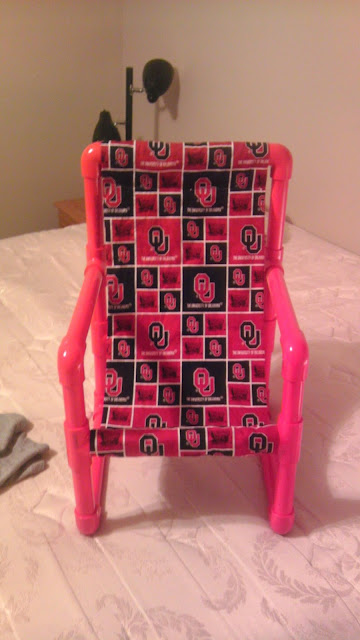
PVC pipe toddler chair

Image
  These are another simple and cheap DIY project that can be done in a few hours. This project was found at Que Linda.   Our boys love these chairs.  They carry these things around everywhere.    You will need one piece of sturdy fabric such as corduray, denim, or upholstery.  I cut the fabric at 29.5" X 17.5".  I used 1/2" seam allowance.  You can adjust the size of the chair and the fabric just as long as the fabric has enough slack when it's put on the chair.    Once the fabric is cut, fold right sides together hot dog style and sew the long sides together. Then, move the seam so it is in the center and iron seams open. Sew shorter sides together.  Leave a few inches on one side. Turn it inside out through that opening. Then lie it flat and fold the short sides towards the middle on the side of the fabric with the seam.  I folded 3" on each side.  Then sew it down.  I ended up sewing two lines so it...